Let’s be real—once you bake your own bread, there’s no going back. Like, what even is that stuff in plastic bags at the grocery store? I mean, sure, it lasts forever… but that’s kinda the problem, right?
If you’re a foodie like me, you’ve probably already tried a few bread recipes here and there. Maybe even had a sourdough phase during lockdown (we all did, no judgment). But this one? This homemade bread recipe is simple, satisfying, and totally doable—even if you’ve never touched a packet of yeast before in your life.
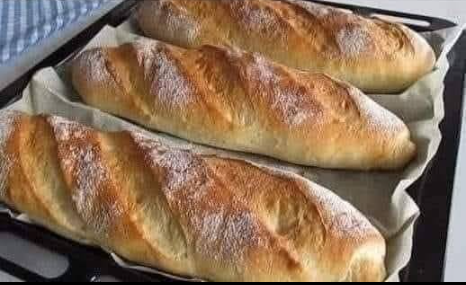
Let’s get our hands floured up and go for it.
Why Homemade Bread Just Hits Different
I used to think homemade bread was, like, for people with backyard chickens and five different types of flour. Not me. I had a tiny kitchen, zero patience, and a deep love for warm carbs.
But one rainy Saturday (yes, it was that kind of day), I gave it a shot. And my apartment smelled like a bakery. The crust crackled when I sliced into it. My roommate took one bite and went, “Okay, what bakery is this from?” I haven’t stopped making it since.
Homemade bread has flavor. It has texture. It has heart. And the best part? You can actually pronounce all the ingredients.
What You’ll Need (Nothing Fancy, Promise)
Ingredients:
- 3 1/4 cups all-purpose flour (plus extra for dusting)
- 2 tsp salt
- 2 tsp sugar
- 1 packet active dry yeast (2 1/4 tsp)
- 1 1/4 cups warm water (about 110°F)
- 1 tbsp olive oil (optional, for extra softness)
Gear:
- Large mixing bowl
- Spoon or silicone spatula
- Clean kitchen towel
- Loaf pan or Dutch oven
- Oven (yep, that’s it)
Step-by-Step: Let’s Bake Some Bread!
1. Get the Yeast Going
In a large bowl, stir the warm water with sugar and sprinkle in the yeast. Let it chill for 5-10 minutes. You want it to get all bubbly and foamy on top—that’s how you know the yeast is alive and kickin’.
Pro tip: If nothing’s happening after 10 minutes, toss it and try again with fresh yeast. Dead yeast = sad, flat bread.
2. Mix It All Together
Add in the flour and salt. Stir with a spoon until it turns into a shaggy dough. Then roll up your sleeves and knead it for about 8 minutes right in the bowl—or on a floured counter if you’re feelin’ fancy.
The dough should be smooth and a little tacky, but not sticky like glue. If it’s super wet, sprinkle in more flour, a tablespoon at a time.
3. Let It Rise
Form the dough into a ball, coat it lightly with olive oil (optional, but it keeps it from drying out), and cover the bowl with a clean towel.
Let it sit in a warm spot for 1 to 1.5 hours until it doubles in size. If your kitchen’s cold, try placing the bowl in the (turned off) oven with the oven light on. Works like a charm.
4. Shape It and Rest Again
Punch down the dough gently (yeah, go ahead—get that stress out), shape it into a loaf, and place it in a greased pan or on parchment in your Dutch oven.
Cover again and let it rise for another 30 to 45 minutes. It should puff up a bit but doesn’t need to be dramatic.
5. Bake Time!
Preheat your oven to 375°F. Bake for 30–35 minutes until the top is golden and the loaf sounds hollow when you tap it.
If you’re using a Dutch oven, you can go for 450°F for 25–30 minutes with the lid on, then remove the lid for the last 10 minutes to brown the top.
Let it cool (at least a little) before slicing—I know, the hardest part.
Tips for Making It Even Easier
- Short on time? Use rapid-rise yeast and skip the first rise.
- Want a crispy crust? Bake it with a pan of water in the oven for that steamy bakery vibe.
- No loaf pan? Shape it into a ball and bake it right on a sheet—rustic is always in.
- Feeling fancy? Toss in some rosemary, garlic, or shredded cheese. Go wild.
How to Keep Homemade Bread Fresh (Without Weird Preservatives)
Okay, you just made the best homemade bread ever. Now don’t let it go stale on you.
Wrap it in a clean kitchen towel and keep it on the counter. It’ll last a good 2–3 days like that. Want more time? Pop it in a paper bag inside a plastic container (not fully sealed). Or slice and freeze it for toast-ready goodness anytime.
Final Thoughts (and a Warning)
Once you start baking homemade bread… you kinda can’t stop. You’ll be texting your friends pictures of crumb shots. You’ll start judging bakery prices. You’ll probably start a little bread journal (okay, maybe that’s just me?).
But seriously—this stuff is soul food. It’s cozy. It’s real. And it makes your kitchen smell like the warmest hug you’ve ever had.
So grab some flour, cue up your favorite playlist, and make some homemade bread. You got this.
Leave a Reply