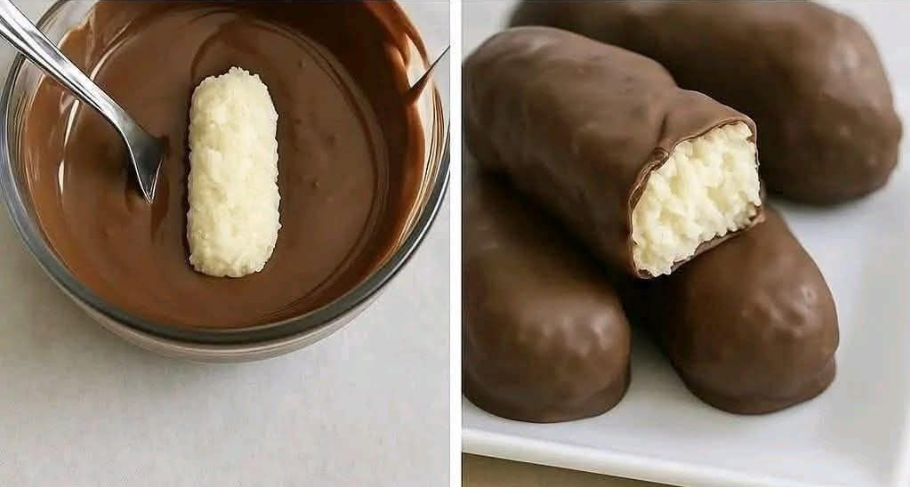
There’s something special about homemade candy bars. Maybe it’s the fresh taste, maybe it’s knowing exactly what went into them, or maybe it’s that first bite when the chocolate shell cracks and the soft coconut center melts in your mouth. Honestly, it never gets old.
These Homemade Coconut Chocolate Bars are simple, rich, and seriously satisfying. If you love coconut desserts and chocolate snacks, this recipe brings both together in the best way. It uses only a few ingredients, takes very little prep time, and tastes like something you’d grab from a candy shop.
The best part? You don’t need baking skills or fancy equipment. Just mix, shape, chill, dip, and enjoy.
If you’re a fan of classic coconut candy bars, this homemade version may become your new favorite.
Why Food Lovers Enjoy Homemade Coconut Chocolate Bars
Store-bought candy bars are convenient, sure. But homemade bars have a fresher taste and softer texture that many people prefer.
Here’s why these bars stand out:
- Made with only a handful of ingredients
- Rich coconut filling with real flavor
- Smooth chocolate coating
- No baking required
- Great for holidays, gifts, or snack trays
- Easy to customize with dark or milk chocolate
They also store well, which means you can make a batch ahead of time and enjoy them all week.
Ingredients You’ll Need
This recipe keeps things simple and classic.
- 2 cups shredded coconut
- 1 cup sweetened condensed milk
- 1 teaspoon vanilla extract
- 200–300 g chocolate (milk or dark)
That’s it. Four ingredients, big reward.
Ingredient Notes
Shredded Coconut
Use unsweetened or sweetened shredded coconut based on your taste preference. Unsweetened gives a more balanced sweetness, while sweetened creates a candy-style filling.
Sweetened Condensed Milk
This binds the coconut mixture together while adding creamy sweetness. It’s the key to that soft center.
Vanilla Extract
A small amount adds warmth and depth to the filling.
Chocolate
Milk chocolate creates a sweeter bar. Dark chocolate gives a richer contrast with the coconut. Honestly, both are excellent.
How to Make Homemade Coconut Chocolate Bars
Step 1: Mix the Coconut Filling
In a medium bowl, combine:
- Shredded coconut
- Sweetened condensed milk
- Vanilla extract
Stir until everything is evenly coated and the mixture holds together.
It should be thick and sticky, but easy to press with a spoon.
Step 2: Shape the Bars
Line a tray or plate with parchment paper.
Take portions of the coconut mixture and shape them into small rectangles or bars using your hands. You can also make squares if that feels easier.
Try to keep them similar in size so they chill evenly.
Place each bar on the lined tray.
Step 3: Chill Until Firm
Transfer the tray to the refrigerator for about 30 to 45 minutes.
This step helps the bars firm up, making them much easier to dip in chocolate later.
If you’re in a hurry, you can place them in the freezer for about 15 minutes.
Step 4: Melt the Chocolate
Break the chocolate into pieces and melt it using one of these methods:
Microwave Method
Heat in 20-second intervals, stirring between each round until smooth.
Double Boiler Method
Place a heat-safe bowl over a pot of gently simmering water. Stir until melted.
Once melted, let the chocolate cool slightly for a minute or two.
Step 5: Coat the Bars
Remove the chilled coconut bars from the fridge.
Using two forks or a dipping tool, lower each bar into the melted chocolate. Coat fully, then lift and let excess chocolate drip off.
Place coated bars back onto parchment paper.
Repeat until all bars are covered.
Step 6: Set the Chocolate
Place the tray back in the refrigerator until the chocolate hardens.
This usually takes about 15 to 20 minutes.
Then they’re ready to eat.
And yes, it’s hard to wait.
Pro Tips for Better Coconut Chocolate Bars
Use Good Chocolate
Since chocolate is a main flavor here, quality matters. A smoother chocolate gives a cleaner finish and better taste.
Chill the Filling Well
If the bars feel soft, chill longer before dipping. Firm centers make coating much easier.
Keep Hands Slightly Damp
If the coconut mixture sticks while shaping, lightly damp hands can help.
Add a Second Chocolate Layer
For a thicker shell, let the first coating set, then dip again.
That extra snap? Worth it.
Easy Flavor Variations
Want to switch it up a bit? Try one of these ideas.
Almond Coconut Bars
Press one almond on top of each coconut bar before coating.
Sea Salt Dark Chocolate Bars
Use dark chocolate and sprinkle a tiny pinch of sea salt on top.
White Chocolate Coconut Bars
Swap the coating for melted white chocolate.
Toasted Coconut Version
Toast part of the shredded coconut before mixing for a nuttier flavor.
Best Times to Serve These Bars
These bars fit almost any sweet moment.
- Afternoon coffee break
- Holiday dessert trays
- Homemade gifts
- Birthday party sweets table
- Late-night chocolate craving
- Weekend treat from the fridge
They also look polished enough to serve guests.
How to Store Homemade Coconut Chocolate Bars
Refrigerator
Store in an airtight container in the fridge for up to 1 week.
Freezer
Freeze for up to 2 months. Let them sit at room temperature for a few minutes before eating.
Honestly, they taste amazing slightly chilled.Common Questions
Can I use desiccated coconut?
Yes, but the texture will be finer and slightly denser than shredded coconut.
Can I make these dairy-free?
You would need a dairy-free condensed milk substitute and dairy-free chocolate.
Why is my mixture too soft?
Add a little more coconut and chill longer.
Can I make them smaller?
Absolutely. Bite-sized pieces are great for parties or snack trays.
Why This Recipe Works So Well
The coconut center stays soft and sweet, while the chocolate shell adds richness and contrast. The texture combination is what makes these bars so satisfying.
Plus, because they’re homemade, you can control the sweetness, chocolate type, and shape.
That flexibility makes this recipe a keeper.
Final Thoughts
These Homemade Coconut Chocolate Bars prove that simple ingredients can create something truly special. They’re easy to make, rich in flavor, and perfect for anyone who loves coconut and chocolate together.
Whether you make them for guests, gifts, or just to keep in the fridge for yourself, they bring that candy-bar feeling with a homemade touch.
Make one batch, and honestly, you may start planning the second before the first one is gone.
Leave a Reply